The last installment of this 4-part series ran this morning on Reef Builders. Check it out – http://reefbuilders.com/2011/02/17/ecoxotics-25-gallon-led-aquarium-stunner-strip-final-impressions/
I know some of you are kinda going “what does this have to do with the Lightning Project?”. Well, in a hobby that is currently having a bit of a reality check where sustainability is the new goal, LED Lighting options are one more way in which we’re going to lower the impact of our hobby and even save money in the process. For a captive breeding project born from a sustainable wild harvest project, using LEDs with the energy savings and material savings they represent (you’re not throwing out bulbs every 6-9 months) is just a natural extension of a project that is rooted in sustainability and reducing our impact.
- About The Lightning Project
- Inventory of F1 PNG Lightning and White Stripe Maroon Clownfish
- F1 PNG Lightning Maroon Clownfish, BZLM1
- F1 PNG Lightning Maroon Clownfish, BZLM2
- F1 PNG Lightning Maroon Clownfish, FW1
- F1 PNG Lightning Maroon Clownfish, LM10
- F1 PNG Lightning Maroon Clownfish, LM11
- F1 PNG Lightning Maroon Clownfish, LM12
- F1 PNG Lightning Maroon Clownfish, LM13
- F1 PNG Lightning Maroon Clownfish, LM14
- F1 PNG Lightning Maroon Clownfish, LM15
- F1 PNG Lightning Maroon Clownfish, LM16
- F1 PNG Lightning Maroon Clownfish, LM17
- F1 PNG Lightning Maroon Clownfish, LM18
- F1 PNG Lightning Maroon Clownfish, LM19
- F1 PNG Lightning Maroon Clownfish, LM20
- F1 PNG Lightning Maroon Clownfish, LM3
- F1 PNG Lightning Maroon Clownfish, LM4
- F1 PNG Lightning Maroon Clownfish, LM5
- F1 PNG Lightning Maroon Clownfish, LM6
- F1 PNG Lightning Maroon Clownfish, LM7
- F1 PNG Lightning Maroon Clownfish, LM8
- F1 PNG Lightning Maroon Clownfish, LM9
- F1 PNG Lightning Maroon Clownfish, MD1
- F1 PNG Lightning Maroon Clownfish, MWP3
- F1 PNG Lightning Maroon Clownfish, WS17
- F1 PNG Lightning Maroon, EC1
- F1 PNG Lightning Maroon, GL1
- F1 PNG White Stripe Maroon Clownfish, BZWS1
- F1 PNG White Stripe Maroon Clownfish, BZWS2
- F1 PNG White Stripe Maroon Clownfish, BZWS3
- F1 PNG White Stripe Maroon Clownfish, WS10
- F1 PNG White Stripe Maroon Clownfish, WS11
- F1 PNG White Stripe Maroon Clownfish, WS12
- F1 PNG White Stripe Maroon Clownfish, WS13
- F1 PNG White Stripe Maroon Clownfish, WS14
- F1 PNG White Stripe Maroon Clownfish, WS15
- F1 PNG White Stripe Maroon Clownfish, WS16
- F1 PNG White Stripe Maroon Clownfish, WS4
- F1 PNG White Stripe Maroon Clownfish, WS5
- F1 PNG White Stripe Maroon Clownfish, WS6
- F1 PNG White Stripe Maroon Clownfish, WS7
- F1 PNG White Stripe Maroon Clownfish, WS8
- F1 PNG White Stripe Maroon Clownfish, WS9
- F1 PNG White Stripe Maroon, EC2
- F1 PNG White Stripe Maroon, FW2
- F1 PNG White Stripe Maroon, GL2
- F1 PNG White Stripe Maroon, MD2
- Lightning Breeding Directive
- Lightning Maroon Clownfish Links
- Home
- About The Lightning Project
- Inventory of F1 PNG Lightning and White Stripe Maroon Clownfish
- F1 PNG Lightning Maroon Clownfish, BZLM1
- F1 PNG Lightning Maroon Clownfish, BZLM2
- F1 PNG Lightning Maroon Clownfish, FW1
- F1 PNG Lightning Maroon Clownfish, LM10
- F1 PNG Lightning Maroon Clownfish, LM11
- F1 PNG Lightning Maroon Clownfish, LM12
- F1 PNG Lightning Maroon Clownfish, LM13
- F1 PNG Lightning Maroon Clownfish, LM14
- F1 PNG Lightning Maroon Clownfish, LM15
- F1 PNG Lightning Maroon Clownfish, LM16
- F1 PNG Lightning Maroon Clownfish, LM17
- F1 PNG Lightning Maroon Clownfish, LM18
- F1 PNG Lightning Maroon Clownfish, LM19
- F1 PNG Lightning Maroon Clownfish, LM20
- F1 PNG Lightning Maroon Clownfish, LM3
- F1 PNG Lightning Maroon Clownfish, LM4
- F1 PNG Lightning Maroon Clownfish, LM5
- F1 PNG Lightning Maroon Clownfish, LM6
- F1 PNG Lightning Maroon Clownfish, LM7
- F1 PNG Lightning Maroon Clownfish, LM8
- F1 PNG Lightning Maroon Clownfish, LM9
- F1 PNG Lightning Maroon Clownfish, MD1
- F1 PNG Lightning Maroon Clownfish, MWP3
- F1 PNG Lightning Maroon Clownfish, WS17
- F1 PNG Lightning Maroon, EC1
- F1 PNG Lightning Maroon, GL1
- F1 PNG White Stripe Maroon Clownfish, BZWS1
- F1 PNG White Stripe Maroon Clownfish, BZWS2
- F1 PNG White Stripe Maroon Clownfish, BZWS3
- F1 PNG White Stripe Maroon Clownfish, WS10
- F1 PNG White Stripe Maroon Clownfish, WS11
- F1 PNG White Stripe Maroon Clownfish, WS12
- F1 PNG White Stripe Maroon Clownfish, WS13
- F1 PNG White Stripe Maroon Clownfish, WS14
- F1 PNG White Stripe Maroon Clownfish, WS15
- F1 PNG White Stripe Maroon Clownfish, WS16
- F1 PNG White Stripe Maroon Clownfish, WS4
- F1 PNG White Stripe Maroon Clownfish, WS5
- F1 PNG White Stripe Maroon Clownfish, WS6
- F1 PNG White Stripe Maroon Clownfish, WS7
- F1 PNG White Stripe Maroon Clownfish, WS8
- F1 PNG White Stripe Maroon Clownfish, WS9
- F1 PNG White Stripe Maroon, EC2
- F1 PNG White Stripe Maroon, FW2
- F1 PNG White Stripe Maroon, GL2
- F1 PNG White Stripe Maroon, MD2
- Lightning Breeding Directive
- Lightning Maroon Clownfish Links
So I’ve been keeping an eye on things. The main concern is a very slight level of Nitrite showing up on my tests…less than 0.1 ppm. As soon as that goes away, we should be good to go.
So here’s how the water in the Ecoxotic tested out this morning:
Seachem pH – 8.1
Seachem Free Ammonia – 0 ppm
Seachem Total Ammonia – 1 ppm
(update – after letting it sit, total ammonia was actually closer to 0.1 ppm)
Seachem Nitrite – trace, < 0.1 ppm
Seachem Nitrate – 0 ppm
Salifer Nitrate – 0 ppm
Seachem Total Alkalinity – 2 meq/L
Salifert Calcium – 410 ppm
Seachem Magnesium – 950 ppm
Yes, I actually have a lot of Seachem tests on hand, but my Seachem Calcium test went bad eons ago when the powder it used got rock hard and changed color…probably moisture exposure. I also am only semi-confident in the Seachem Nitrite/Nitrate tests at this point as well, but other test kits seem to confirm the readings. I wish you could just get replacment reagents for these tests as it seems a big waste to order a whole new test kit because one component may no longer be working. I asked Seachem, and sorry, they don’t sell the reagents by themselves.
Of course, after this test I dosed 6 ml of each C-Balance component because I want to see what affect it has on the water. So a bit later today I’ll retest pH, Alkalinity, Calcium and Magnesium to know what a dose does to the system.
Second Test (midday)
This is post dosing:
Seachem pH – 8.1
Seachem Total Alkalinity – 2, maybe 2.25 meq/L
Salifert Calcium – 410 ppm
Seachem Magnesium – didn’t test
Basically, I saw virtually no bump, although the Alkalinity did turn back from yellow to “green” after a minute, which suggests a slight increase but not enough to be in the 2.5 meq/L range. I dosed 6 ML of each two part component again, and will test in a couple hours.
Third Test (afternoon)
Seachem ph – 8.2
Seachem Total Alkalinity – 2.5 to 2.75 meq/L
Salifert Calcium – 420 ppm
Seachem Magnesium – not tested
According to the instructions, the maximum dose is 1 ML per gallon per day, and no more than .5 ml per gallon in one dose. I’ve been doing roughly .25 ml per gallon per dose. So…why not. I’ll dose again now at my .25 ml per gallon, and see where things are a little bit later.
Update – Fourth and Final Test (evening)
Seachem pH – 8.2
Seachem Alkalinity – 2.5 meq/L
Salifert Calcium – 420 ppm
Seachem Magnesium – 1025 ppm
So, dosing .75 ml per gallon of C-Balance showed a rise in pH from 8.1 to 8.2. Total Alkalinity went roughly from 2 to 2.5 meq/L. Calcium seems to have gone up by 10 ppm, from 410 to 420 ppm. Magnesium apparently saw a larger jump, at 950 to 1025 ppm.
Of course, I ran out of Seachem’s Total Alkalinity test reagent at the last test. The question will be whether I get a new Alkalinity test or use the ones that come contained within the Seachem Magnesium test. In the end, I’m not going to dose again today…I don’t want to push that max dose limit. Obviously at this point I can probably do another three .25ml/gallon doses of C-Balance tomorrow and check again at the end of the day. Sounds like a plan.
As far as the Lightning is concerned, I’m going to recheck the nitrites again in a day or two. Once the minimal level has gone away, it will be time to swap Maroons and finally get things going!!!
It’s been a while now and things are going well in the new Ecoxotic tank. Between our son getting sick, me watching him because of it, and somehow still pulling more than a full work week, and then getting sick myself, I’ve been distracted from the project so being “patient” was easy.
I gave the water a test on Saturday morning, February 12th, 2011. pH = 8.1, Free and Total Ammonia 0 ppm, Nitrite and Nitrate 0 ppm, and total alkalinity was at 1.5 meq/L. Hit it with a dose of C-Balance two-part which brought the alkalinity up to 2 meq/L. Still low, but easily fixable. Having a little free time, it was time to call in some payment on the last 4 juvenile Black Ocellaris I had traded to Morgan at Cosmic Aquatics. The trade of course, was for my seed corals – “one frag of each kind of Birdsnest you have”.
In some cases, “frag” meant 4″ colony in Morgan’s mind. I returned from my trip to Superior WI with a full on colony of a Green with Purple Polyps and Pink Tips Seriatopora histrix, as well as a several inch branch of Pink with Purple Polyp version of the species. I also brought back 1 small and 1 larger fresh frag of “Sour Apple” Birdsnest, Seriatopora caliendrum. My fourth birdsnest, ironically, was a piece of a Birdsnest I had given to Morgan when he opened up his shop; my Iowa Ponape Birdsnest, which is currently considered S. hystrix but at least one author has mused it might be something else (like Seriatopora dentritica). I chuckle because I think I’ve given pieces of it to several people in the Duluth area and yet I no longer had it myself.
Still on my “wishlist” for Birdsnests are an actual hot pink with white growing needle-tips S. hystrix. I know they’re out there, I owned one for a couple years, but lately, most hot pink birdsnests I’ve seen around are dirty brown-pink. I’ll also set aside a spot for the classic ORA Green form of S. caliendrum – it’s a stunning coral when grown out.
The coral fun doesn’t stop there, because I also traded some spare stuff for a Tricolor Clavularia and “Hulk” Green Clavularia. These large and colorful clove polyp varieties are some of my favorites, and they were placed in lower light areas where I hope they’ll do well. I’ve had both in the past, but killed both off with my normal “high nitrates” due to many breeding fish all being stuffed with food.
All of the corals were dipped with Seachem’s Reef Dip before being placed into the tank. I was surprised to see that some small feather dusters that were growing at the base of a Birdsnest made it through the dip unscathed. I know the naysayers will say this has NOTHING to do with the breeding project and yup..they’re right. It has everything to do with keeping my wife happy though – for the first time since I set it up, she said it was starting to look “better”. That’s definitely a step in the right direction…best thing I could hope for when I wanted to bring the Lightning Maroon up from the basement to live with us on the first floor.
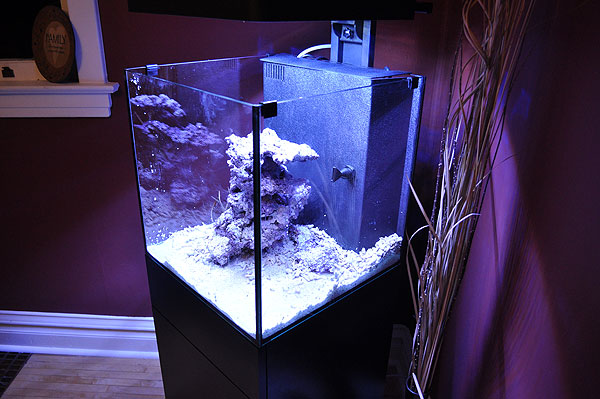
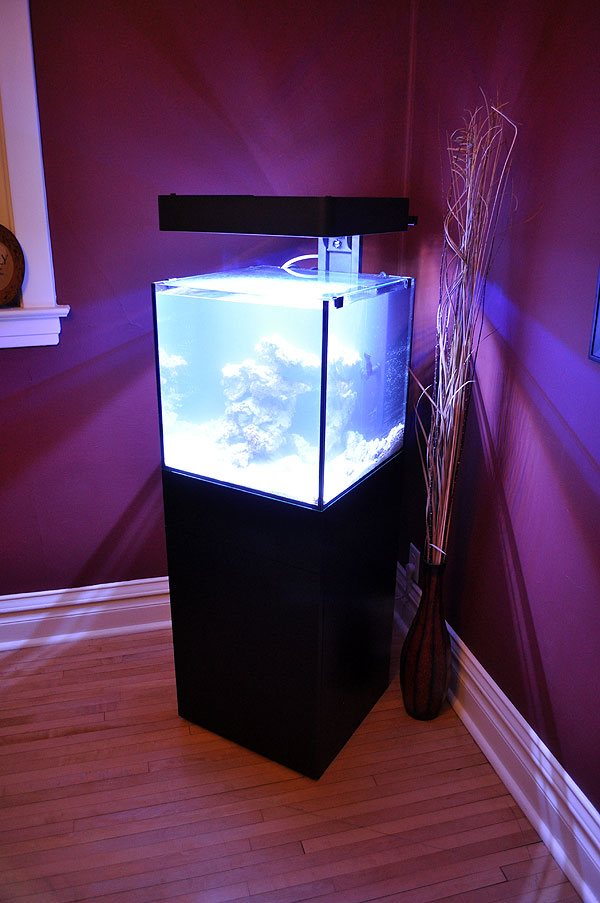
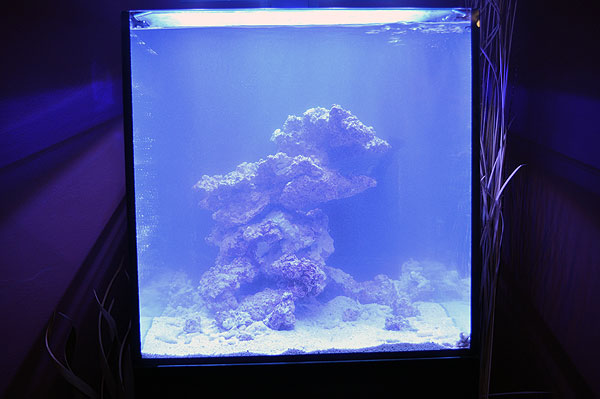
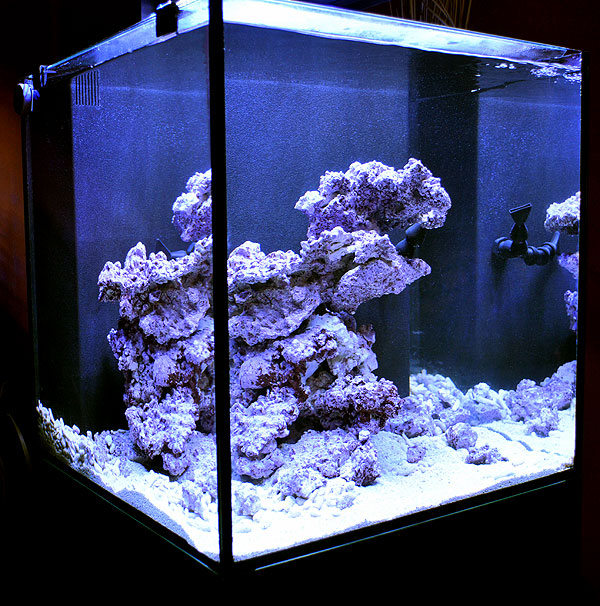
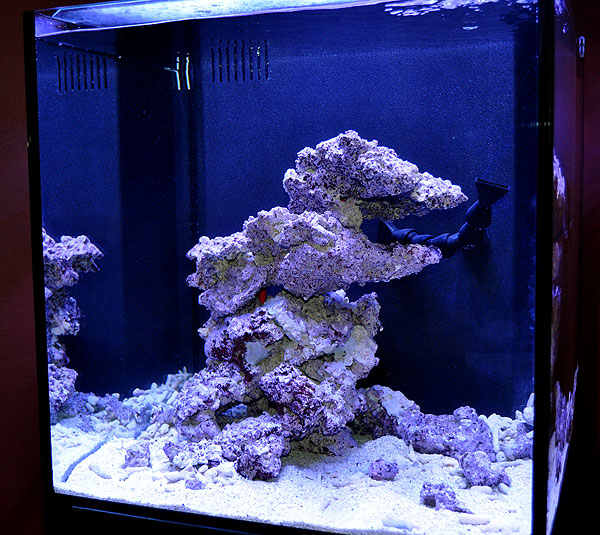
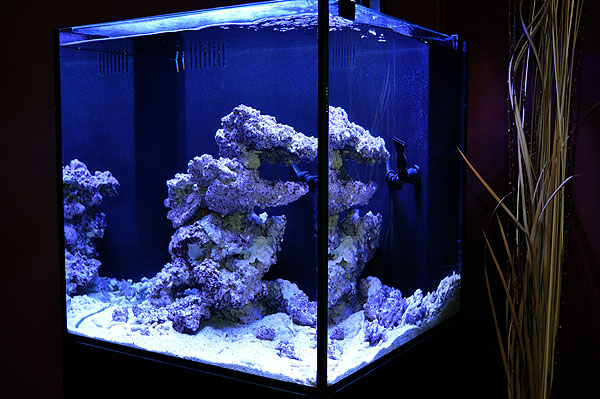
So first, here’s some shots of the tank as set up Saturday evening. Note that I’m playing with camera settings and Photoshop corrections to get real-looking images. I’ve found that photographing this tank when lit up is difficult, primarily due to all the different light coming from the room, outside (if during the day), with or without onboard flash (I have a remote flash somewhere stashed away…probably should break that out). Any shots without Flash, but otherwise automatic settings on the D5000, wind up being very purple-hued, which I’ve tried to handle in Photoshop for the time being.
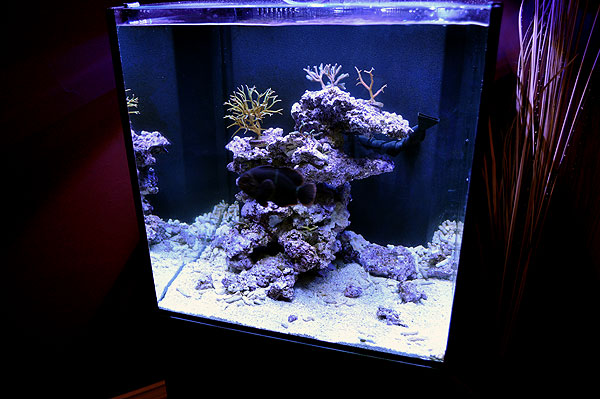


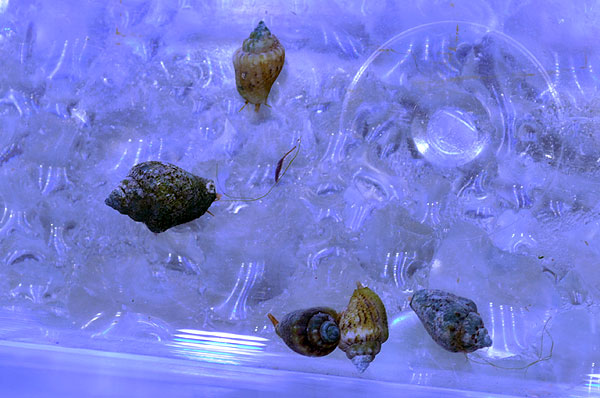
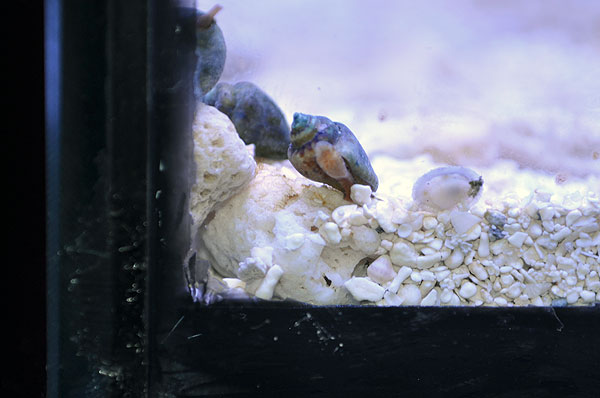
The other interesting thing I picked up from Morgan was a half dozen Stomatella sp. snails, probably Stomatella varia. These small snails are actually closely related to the Trochus, Astrea and Turbo snails we’re all familiar with. Stomatellas have this nice habit of readily reproducing in the aquarium environment without any special care or intervention, provided of course that there aren’t predators that would eat them. They stay small and are nocturnal, which means they can get into small crevices and places larger cleanup crews can’t, all the while staying out of the way during the day when you dont’ want to be looking at 50 snails on your front glass. These made the perfect third snail species addition to my sustainable, all captive-bred cleanup crew.


So that’s what I did on Saturday. I’ve been watching the water quality and dosing with C-Balance. It looks like I might have a very slight level of Nitrite, so I haven’t pulled the trigger on the clownfish swap just yet. As last week was my birthday week, I also treated myself with just a wee-bit of my birthday cash to some additional frags that arrived today, Tuesday, 2-15-2011. More on those in a little bit.
Ecoxotic Unbox @ ReefBuilders – Part 3, the power saving Panorama LED Reef Aquarium Lighting Fixture
This is arguably the most special part of the ensemble. No words spared, it’s another in-depth unboxing article you’ll want to check out if you’re into LEDs. Bottom line for me – Modular LEDs = a win for consumers. Check it out on ReefBuilders – http://reefbuilders.com/2011/02/10/panorama-led-review/
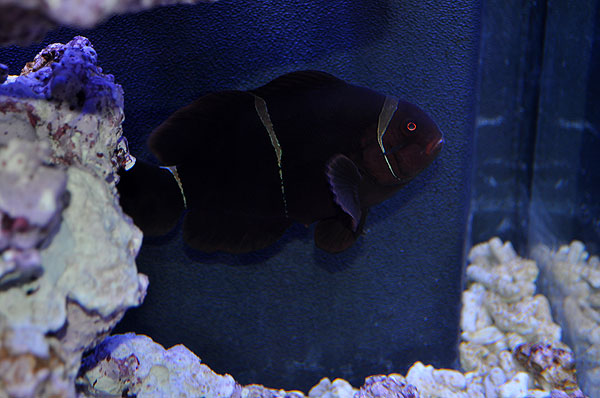
So this afternoon, something rather unexpected happened. The Labrador Maroon’s ovipositor was down. I’ve NEVER seen it down before. It is still down hours later tonight.
So the big question – what now? Of course, it did occur to me that I could introduce the Lightning Maroon to see if I could get a spawn. But that’s risky in the new tank, and also risky if the Labrador turns on the Lightning. I also thought I could add in the “spare” PNG Maroon Male. I’m still seriously considering that. The Labrador Maroon is clearly squared off and ready to spawn…she just needs a mate it would seem. I’m hesitant to risk the spare PNG Male, and kinda the same with the Lightning Maroon. So if this continues, the male from a breeding pair of White Stripes I got from Greg may get called into action tomorrow. I’ll have to keep a close eye on things, but the male used to spawn (just hasn’t since I moved them here).
Why this couldn’t have happened at any point in the last 8 months or so when the Lightning was there is beyond me! I sent the following email to many of the most talented marine fish breeders I know, and hopefully we’ll get some interesting comments:
With sustainability at the forefront of this project, the moment I saw this in my tank I knew I was ready for the next step. Tuesday, I decided to tackle this:
I didn’t go rushing out for a couple dozen Astrea snails or Dwarf Blue Legged Hermits from Florida. No, I opted to look at my own tanks and there’s some interesting things going on.
For years now, I’ve had these little limpets. These tiny algae eating snails never seem to get algae growing on themselves, and they happily reproduce in my tanks. They don’t seem to get out of control, nor do they get very large. That makes them great for cleaning every little crevice.
When visiting Colorado last year for Reef Ed by MASC, I got to see Joe Thompson and Andrew Berry, two marine breeders (both MBI Council members) who introduced me to the spineless side of breeding – inverts! Andy and Joe each gave me their speciality. Joe’s snails I think are all gone, but Andy’s RSF Collumbelid snails, which may or may not be the same as the Indo Pacific Sea Farms “Strombus Grazers”. Regardless, these great little snails readily reproduce in the aquarium, laying small egg cases which hatch out little baby snails!
So I’m obviously being careful about WHERE things come from too. The Limpets came from the tank that houses the future mate of the Lightning Maroon. The Columbelid snails came from a 10 gallon tank that hasn’t seen any new fish in maybe 6 months. In addition to these snails, I also harvested about a dozen Amphipods from the refugium on my larviculture system. They were rinsed in clean saltwater and then removed and introduced by hand.
When I talk about breeding marine fish, I talk about preserving the future of our hobby given what I perceive as the inevitable loss of wild caught sources for our fish sometime in this century. What we don’t often think about are things less sexy – the snails, hermit crabs, and other organisms that help our reef tanks function properly. While this “starter crew” is not nearly enough to keep the tank free of algae, they will contribute to a hopefully self-sustaining population of cleanup critters that will readily reproduce in the tank. In theory, I shouldn’t have to revitalize my cleanup crew in a year when half of them have died off (as you would with things that don’t reproduce so readily).
There will be another captive-bred introduction in a few weeks time. I won a gift certificate to Aloha Corals, and it just so happens that Aloha Corals breeds and rears the Hawaiian Turbo Snail. So, after going through QT, these guys will get added too! If I can get my hands on some of the RSF Nassarius that I got from Joe earlier, and maybe some Stomatellas, I’ll hopefully have a 100% captive-bred snail crew to handle all the cleanup needs of this tank. It’s truly exciting to think about how this may impact the future of our hobby.
Short and Sweet, the second of the 4-part series coving the unboxing of the Ecoxotic 25 gallon LED Aquarium System is up at ReefBuilders. Check it out here – http://reefbuilders.com/2011/02/07/ecoxotics-25-gallon/
Considering the “sustainable” inspiration behind the Lighting Project, it seemed only fitting that the live rock used in the Lightning Maroon’s final home shouldn’t be hacked off a reef or dug out of a lagoon. It was that inspiration that got me looking around at more sustainable rock choices. Of course, the most sustainable live rock might actually be the live rock that’s already been collected and harvested, so I had purchased “used” live rock from a fellow hobbyist (Josh G.), covered in various blue, green striped, and green fuzzy mushroom anemones. But of course, when my local SPS guru Jay H. saw that I wanted to use that rock, he kinda had a heart attack! Apparently, mushrooms in a SPS tank tend to be problematic (aka. take over, sting your SPS etc.). So that rock was nixed, and I was back to square one.
As you may know there is more than one company in Florida who use terrestrially-sourced rock, place it in the ocean, and harvest it after a year or two (Tampa Bay Saltwater, Sea Life Inc and many others). Of course, dry rock has taken the aquarium hobby by storm, with both Bulk Reef Supply and Marco Rocks being two popular sources. Then there’s ceramic rocks. Not to mention the various DIY rocks that hobbyists have come up with. All these dry and man-made options have the downsides of being very sterile and stark, taking months to become fully covered in coraline algae. Florida live rock was looking like a good choice.
Of course, I had just recently noticed a product called “Real Reef” Live Rock in the Diver’s Den section @ LiveAquaria.com. I asked Kevin Kohen (Director of Live Aquaria) about this rock, and that’s what led to a sampling of both Real Reef Live Rock (from Fish Heads Inc) and Fiji Cultured Live Rock (Sasaul Tawamuda Live Rock from Walt Smith International). That ultimately led to a “battle royale” of these two man-made, aquacultured live rock products on Reef Builders. Truly, both products wound up being “different” but “equal”, a true draw. Any decision a hobbyist may make between the two would come down to individual preferences and trade-offs given the materials and the way each rock was cultured.
Personally, for the Lightning Project, if I was choosing between all the various cultured live rock options out there, Real Reef Rock ended up being the winner for one big reason – it never touches the ocean. It never sees fish. There is zero chance of hitchhikers or parasites coming on this live rock. So when thinking about the live rock that will ultimately share the tank with a one-of-a-kind, irreplaceable clownfish, the fact that it was parasite and hitchhiker free helped Real Reef live rock beat out all other contenders.
Of course, as it happened, Mark @ Fish Heads Inc. told me they were just about to release 2 new variations of Real Reef Live Rock, and asked if I’d be willing to give these new products (Nano Rock and Shelf Rock) a look and review. That, and would I be interested in using it for the Lightning Maroon’s tank? Ha! Indeed, this was just the perfect circumstances. Mark reserved some choice pieces, meanwhile selling out of both new products in the very first week! Tuesday, a great looking box showed up courtesy of Fish Heads Inc.
After doing the unboxing (it’ll be on Reef Builders soon and I’ll update a link here), Nick K. and I got busy trying to come up with the aquascape for the Exocotic tank. Coincidentally, the shipping box used roughly matched the inside dimensions of the tank, so the inner portion of the lid was the perfect footprint. We went through 5 iterations of designs that we liked – for each one, we took a shot, and then took shots “disassembling” the rock structure piece-by-piece, so that we could reconstruct whichever we ultimately chose.
My ultimate plan for this tank’s coral life is to feature various bonsai-maintained colonies of Birdsnest Coral, primarily the thin-branch types (Seriatopora hystrix). These will be placed on the upper shelves of the structure. Below, probably a mixture of LPS. Initially I had really wanted to put a Green Bubble Tip Anemone in place – this is the natural host for the Lightning Maroon. However, the wandering habits of BTAs conflict with the concept of a SPS tank, so instead, I’m leaning towards some big green Goniopora sp. to act as a host perhaps. I have a thing for Brain Corals – a teal and brown Maze Brain (Platygyra spp.) has been a must on my list for half a decade, and lately some of the Australian Prism Brain Corals (Goniastrea palauensis) showing up in the Diver’s Den have been beyond drool worthy (I don’t think they will mind if I post these images, copyright LiveAquaria.com, here for demonstrative purposes!)
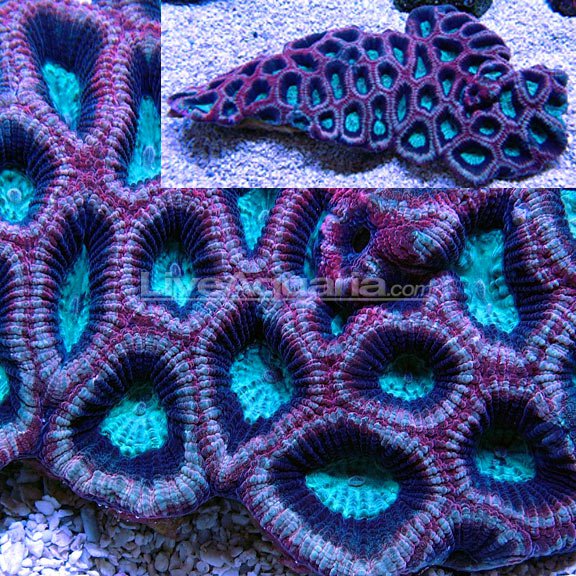
Goniastrea palauensis, Aussie Prism Closed Brian Coral - copyright 2011 LiveAquaria.com - used with permission
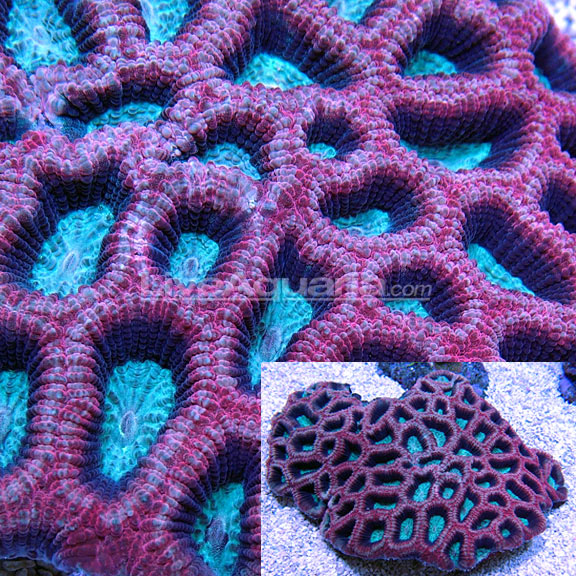
Goniastrea palauensis, Aussie Prism Closed Brian Coral - copyright 2011 LiveAquaria.com - used with permission
Obviously, I’m getting ahead of myself talking about livestock…at this point in the story the tank doesn’t even have saltwater in it yet! Still, planning your livestock will certainly help drive your hardscape. Knowing that I’m planning on letting corals grow in, the rockwork was intentionally meant to be a framework, a foundation, and that meant it keeping the amount of rock on the lighter side of things.
Once we had settled on the 5th incarnation as the one that seemed the least contrived and yet functionally ideal, we set to the task of making it actually work. That meant drilling the rock, using the fiberglass driveway markers and underwater epoxy putty to make a couple crucial joints.
Of course, we broke a couple of the rocks during the drilling process, but not because of drilling. No, it was the downwards pressure on them keeping them stable. Once things were pegged and glued, the main structure was brought upstairs and placed directly on the glass. The reasoning behind this came from Jay H. again. If the Maroons start digging, the rockwork could fall on the glass. By already being stable and on the glass, the risk of cracking the bottom via shifting rockwork is greatly reduced.
The next step? Substrate. Taking a page from how far planted tanks have driven freshwater hardscapes, I didn’t just throw in sand and call it a day. Far from it. First, I laid down a base of about 10 lbs sand, specifically Caribsea’s Arag-Alive, Special Grade Reef Sand. Kept the sand shallow on this one. Between this bagged live sand, and the fully cultured and cured Real Reef Live Rock, the “break in period” (aka. the new tank cycling) should be minimal.
Next up came the coarser substrate. Almost 20 years ago now, I remembered we use to get big bags off coral rubble that we used as a substrate for marine tanks. The size was more pebble-like…some pieces up to 2 inches in length. These days, this rubble isn’t so easy to find. Turns out, I had read about this “rubble” on Reef Builders of all places, referred to as “Coral Bones” in Two Little Fishies’ Reborn Calcium Reactor Media. Given that some companies have moved to other calcium sources for reactor material, I gave Two Little Fishies an email to see if they still used the same material – they do. They even went one-better and sent me some for the aquascaping project.
Just like I remembered it – well worn coral branches, like sea glass, this is the “coral bones” I was looking for. I placed the coral bones around the back, and around the base of the live rock, creating a transition between the live rock and sand. I used maybe 2lbs of the 8 lb. batch TLF sent me.
After that, water was added slowly so the substrate wouldn’t be disturbed. As it happens with fresh live sand, initially, things were pretty cloudy.
The final touch involved a use of the Real Reef rock rubble. A couple handfuls scattered around the substrate created the missing link. Live rock, rock rubble, coral bones, coral sand.
48 hours later, things had cleared up a bit. Time for some better images!
And after taking those pictures, in went the Labrador Maroon. Now we wait for a couple weeks and see how the water quality goes. When things are right, out goes the Labrador, and in goes the Lightning!
The past 48 hours have seen a lot of progress. Real Reef Live Rock arrived from Fish Heads on Tuesday. Tuesday evening, Nick and I spent a lot of time in the basement aquascaping before coming to rest on our 5th or 6th main iteration. Then we assembled it, brought it upstairs, added in about 10 lbs of CaribSea Arag-Alive Special Reef Grade, accented it with coral bones from Julian Sprung’s Two Little Fishes Reborn calcium reactor media. Let it run for about 48 hours, and the Labrador Maroon went in tonight to be the “test” fish. A FULL detailed writeup and pictures will come, probably sometime over the weekend! Progress IS being made…the Lighting Maroon sits and waits for the “all clear” signal on the Ecoxotic tank, and then the last move will be made!
Well, it has started. The first of a 4-part article series on unboxing and assembling the Ecoxotic 25 gallon LED Aquarium System. Ultimately, rather than flood The Lighting Project with the same content, I’ll just point you to the ReefBuilders articles as they appear. Many more pictures of this setup will be included in the 4-part series, so it’s worth a look if you’re interested in the tank! Thanks again for sending the tank Ecoxotic – it’s going to make a great home for our PNG Ambassador!
http://reefbuilders.com/2011/01/31/ecoxotics-25-gallon-part-1/
Enjoy!
Matt





Recent Comments