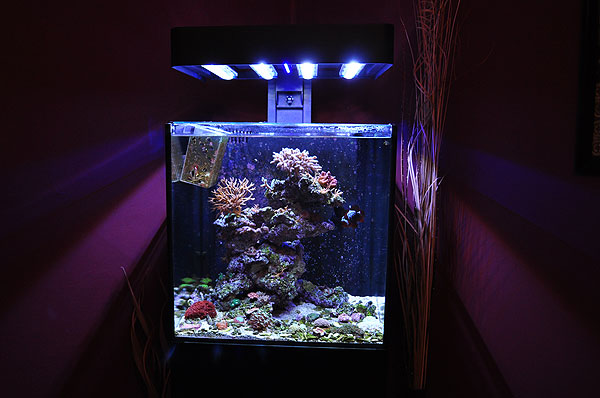
 It’s been almost 4 months since the Ecoxotic was set up for the Lightning Maroon…and some SPS! Overall, I’ve been very, very pleased with the tank. Unlike some of the other smaller tanks on the market, I love how easily and brilliantly this one cleans up. Being glass, I can take a razor blade to it if the algae gets out of control. Using 7th Generation Glass Cleaner, I can deal with some really nasty salt drips and spills. But perhaps the best part is how wonderfully the stand cleans up. Once Ike turned me onto Cabinet Magic, well, this tank can be restored to showroom quality in minutes. The only thing I can’t clean up is the back plastic filter box; the moment it got coraline algae growing on it, I couldn’t get it off even with a safe-for-acrylic algae pad.
One of the questions I got a lot was about the skimmer. People want to know if the built in skimmer really gets the job done. Well, what can I say other than “it works”?

Of course, that was only a couple days after cleaning. You should see it after a few weeks – the sludge in the riser tube gets sickly. Noise? Well, it’s not whisper quiet – most all of the noise comes from the skimmer churning up the air. Everything is pretty sealed up, pretty quiet, and since there are no fans on the lightning, well, this tank runs at a respectable and reasonable level of noise.
Of course, the thing people really want to know is how are the LEDs at growing coral? Well, they are pretty darn good at growing the corals I’ve thrown in there. The Birdsnests are branching like crazy, so light is clearly not an issue. Still, color has been an issue, even on the Birdsnests. Most of the Birdsnests browned out pretty much on introduction, but after a couple months the color was starting to come back. At night, with the actinic Stunner Strip, and corals that are dull are popping.
Well, it turns out that there was a reason that Ecoxotic refined the Panorama units to include more blue. It seems that the actinic blue wavelengths are important not just due to the florescence they create, but they also help actually develop the overall general coloration of the corals. You see, while I really like the “white light” look, it’s good for growth but not so much for color. Of course we kinda already knew about that, which is why no one runs 5500K bulbs anymore, let alone 10K by themselves!

Part of the solution? MORE BLUE! And so begins the a step-by-step addition of a second actinic stunner strip and an all blue Panorama module.
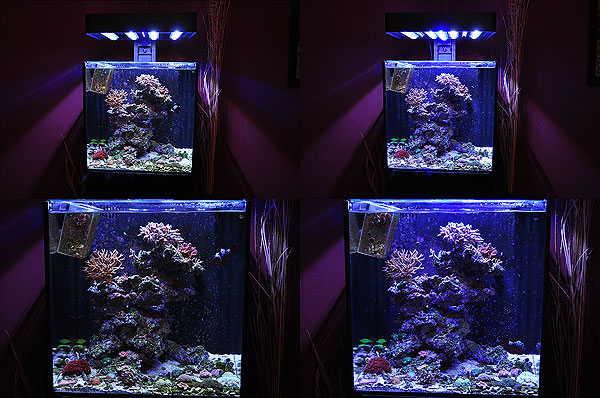
Here’s the stock Panorama setup – one actinic Stunner Strip and four of the Gen 1 Panorama Modules. ALL of the photos before, during, and after, were photographed on manual settings so Shutter Speed (if I recall correctly, 1/60 on tank shots, 1/200 on light shots), White Balance (probably set at none or fluorescent..can’t remember now), Aperture (3.5 on full, 4.5 on closeups) , ISO (400 on tank shots, 200 on light shots?), all are identical to give a true comparison.
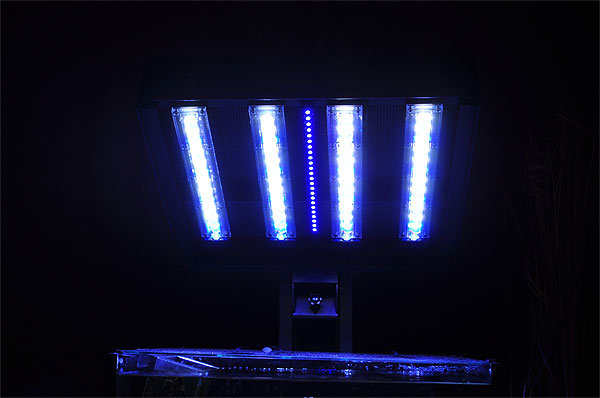
Step 1 – reposition the existing stunner strip to the open space on the left. Take the cover off the pigtail and daisy chain on the second stunner strip.
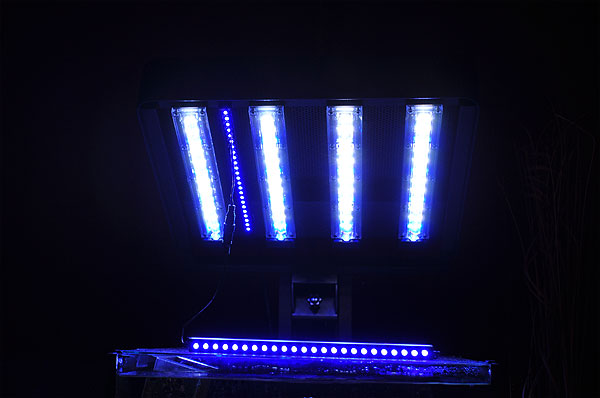
Step 2 – Mount the second stunner strip in the far right space. This was done using the clips and 3M double sided foam tape, as I did with the first one.
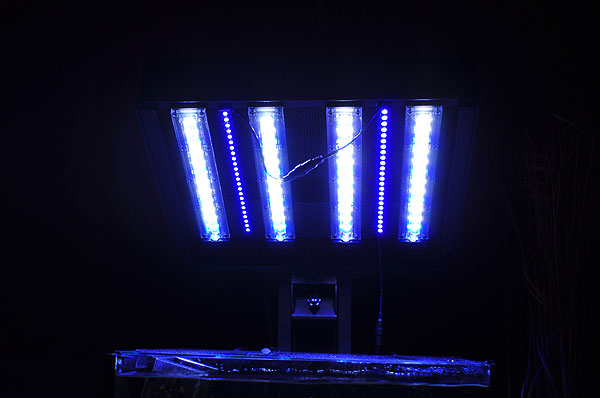
Step 3 – disconnect, and reroute the connection on the stunners to run on top of the Panorama modules. Cap off the pigtail on the second stunner strip and tidy up the loose end with the included cord clips.
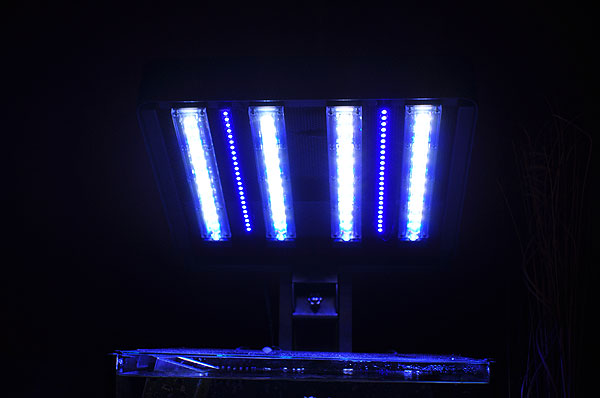
Step 4 – install the Stunner Strip Reflectors. Now, seriously, these are a no-brainer…they just clamp on and are good to go. I’m not sure how much more the add, but the certainly don’t hurt things. Then again, look at how much more things *pop* once the reflectors are installed.

Step 5 – break out the all Blue Panorama unit.
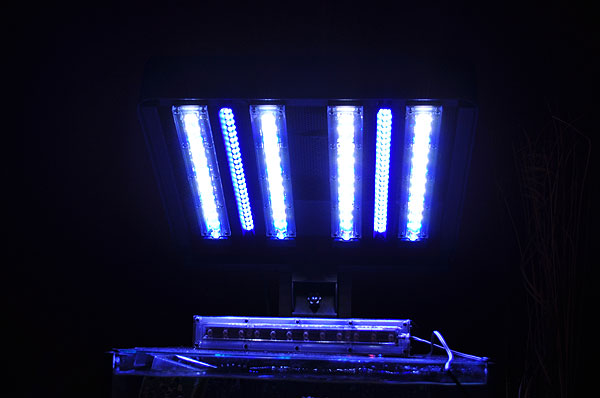
Step 6 – Install the Panorama unit in the middle spot. For this, I once again just used 3M double-sided foam tape.
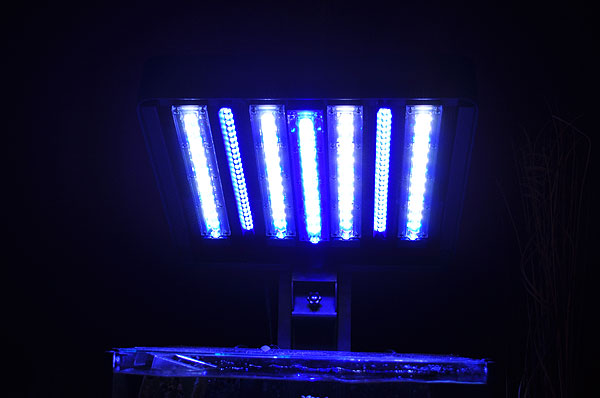
And there it is. “More Blue”!
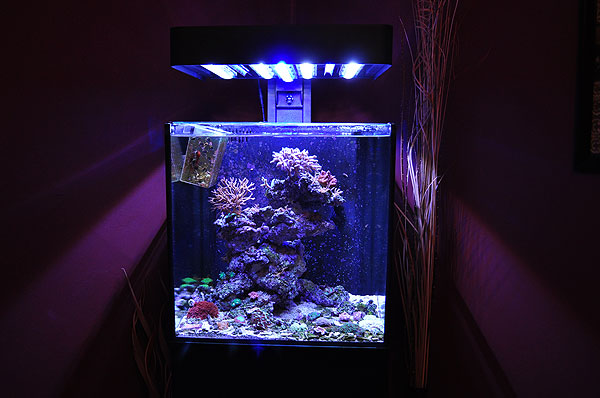
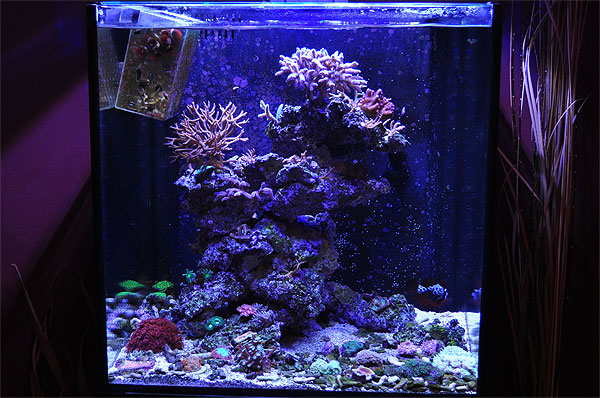
Of course, it’s hard to say just exactly what the difference is until you see the before and after, side-by-side. Before is on the left, after is on the right. Again, the settings for all of these were the same, so the difference is accurate as seen.
So overall, things are looking good and I expect they’ll only get better. I should again point out that corals were growing well under the stock lighting – this additional blue is to see how much more color I can bring to the mix via lighting. Here’s some closeups after pimpin’ out the lighting a bit…
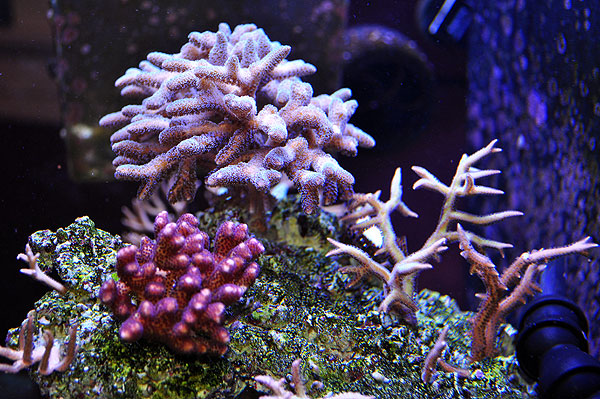
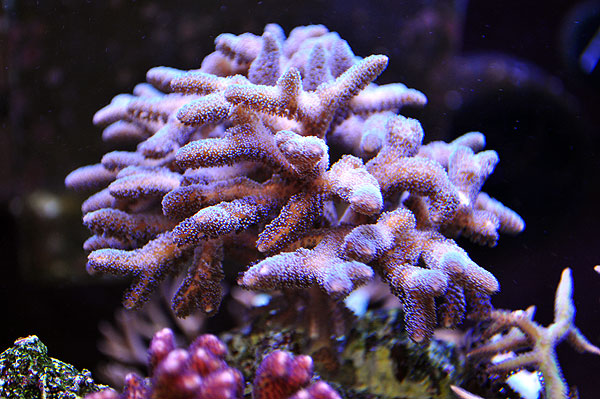
This is a bright red birdsnest I got from Frank, a local reefer. Already shifting purplish after a couple days under the LEDs.
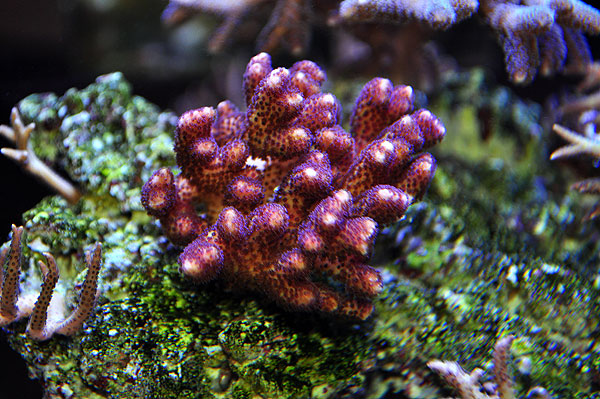
I believe Morgan called this one a Sour Apple Birdsnest..it was a minty seafoam with orange base, but here…well, it’s looking lavender.
The ORA Red Goniopora is lookin’ sweet!

The Alveopora is lookin’ sweet too!
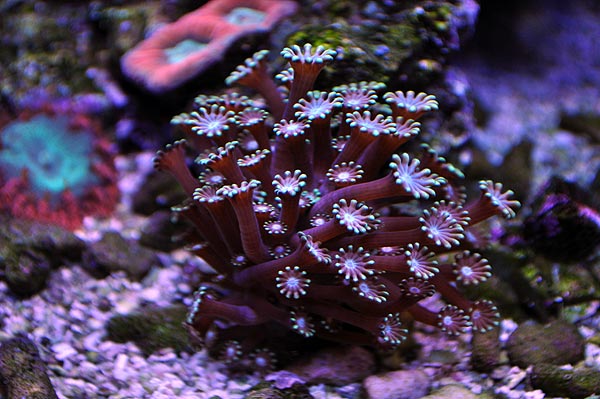
Under the overhang, I’ve placed some Balanophyllias…they grow like weeds, got ’em from Tiffany and can be traced back to a Diver’s Den offering on LiveAquaria.com. I’ll keep sayin’ it – NPS is the new SPS!

That about wraps it up for the moment! My next project – a third introduction of the little male PNG Maroon to the Lightning…will this be the time it works?
- About The Lightning Project
- Inventory of F1 PNG Lightning and White Stripe Maroon Clownfish
- F1 PNG Lightning Maroon Clownfish, BZLM1
- F1 PNG Lightning Maroon Clownfish, BZLM2
- F1 PNG Lightning Maroon Clownfish, FW1
- F1 PNG Lightning Maroon Clownfish, LM10
- F1 PNG Lightning Maroon Clownfish, LM11
- F1 PNG Lightning Maroon Clownfish, LM12
- F1 PNG Lightning Maroon Clownfish, LM13
- F1 PNG Lightning Maroon Clownfish, LM14
- F1 PNG Lightning Maroon Clownfish, LM15
- F1 PNG Lightning Maroon Clownfish, LM16
- F1 PNG Lightning Maroon Clownfish, LM17
- F1 PNG Lightning Maroon Clownfish, LM18
- F1 PNG Lightning Maroon Clownfish, LM19
- F1 PNG Lightning Maroon Clownfish, LM20
- F1 PNG Lightning Maroon Clownfish, LM3
- F1 PNG Lightning Maroon Clownfish, LM4
- F1 PNG Lightning Maroon Clownfish, LM5
- F1 PNG Lightning Maroon Clownfish, LM6
- F1 PNG Lightning Maroon Clownfish, LM7
- F1 PNG Lightning Maroon Clownfish, LM8
- F1 PNG Lightning Maroon Clownfish, LM9
- F1 PNG Lightning Maroon Clownfish, MD1
- F1 PNG Lightning Maroon Clownfish, MWP3
- F1 PNG Lightning Maroon Clownfish, WS17
- F1 PNG Lightning Maroon, EC1
- F1 PNG Lightning Maroon, GL1
- F1 PNG White Stripe Maroon Clownfish, BZWS1
- F1 PNG White Stripe Maroon Clownfish, BZWS2
- F1 PNG White Stripe Maroon Clownfish, BZWS3
- F1 PNG White Stripe Maroon Clownfish, WS10
- F1 PNG White Stripe Maroon Clownfish, WS11
- F1 PNG White Stripe Maroon Clownfish, WS12
- F1 PNG White Stripe Maroon Clownfish, WS13
- F1 PNG White Stripe Maroon Clownfish, WS14
- F1 PNG White Stripe Maroon Clownfish, WS15
- F1 PNG White Stripe Maroon Clownfish, WS16
- F1 PNG White Stripe Maroon Clownfish, WS4
- F1 PNG White Stripe Maroon Clownfish, WS5
- F1 PNG White Stripe Maroon Clownfish, WS6
- F1 PNG White Stripe Maroon Clownfish, WS7
- F1 PNG White Stripe Maroon Clownfish, WS8
- F1 PNG White Stripe Maroon Clownfish, WS9
- F1 PNG White Stripe Maroon, EC2
- F1 PNG White Stripe Maroon, FW2
- F1 PNG White Stripe Maroon, GL2
- F1 PNG White Stripe Maroon, MD2
- Lightning Breeding Directive
- Lightning Maroon Clownfish Links
- Home
- About The Lightning Project
- Inventory of F1 PNG Lightning and White Stripe Maroon Clownfish
- F1 PNG Lightning Maroon Clownfish, BZLM1
- F1 PNG Lightning Maroon Clownfish, BZLM2
- F1 PNG Lightning Maroon Clownfish, FW1
- F1 PNG Lightning Maroon Clownfish, LM10
- F1 PNG Lightning Maroon Clownfish, LM11
- F1 PNG Lightning Maroon Clownfish, LM12
- F1 PNG Lightning Maroon Clownfish, LM13
- F1 PNG Lightning Maroon Clownfish, LM14
- F1 PNG Lightning Maroon Clownfish, LM15
- F1 PNG Lightning Maroon Clownfish, LM16
- F1 PNG Lightning Maroon Clownfish, LM17
- F1 PNG Lightning Maroon Clownfish, LM18
- F1 PNG Lightning Maroon Clownfish, LM19
- F1 PNG Lightning Maroon Clownfish, LM20
- F1 PNG Lightning Maroon Clownfish, LM3
- F1 PNG Lightning Maroon Clownfish, LM4
- F1 PNG Lightning Maroon Clownfish, LM5
- F1 PNG Lightning Maroon Clownfish, LM6
- F1 PNG Lightning Maroon Clownfish, LM7
- F1 PNG Lightning Maroon Clownfish, LM8
- F1 PNG Lightning Maroon Clownfish, LM9
- F1 PNG Lightning Maroon Clownfish, MD1
- F1 PNG Lightning Maroon Clownfish, MWP3
- F1 PNG Lightning Maroon Clownfish, WS17
- F1 PNG Lightning Maroon, EC1
- F1 PNG Lightning Maroon, GL1
- F1 PNG White Stripe Maroon Clownfish, BZWS1
- F1 PNG White Stripe Maroon Clownfish, BZWS2
- F1 PNG White Stripe Maroon Clownfish, BZWS3
- F1 PNG White Stripe Maroon Clownfish, WS10
- F1 PNG White Stripe Maroon Clownfish, WS11
- F1 PNG White Stripe Maroon Clownfish, WS12
- F1 PNG White Stripe Maroon Clownfish, WS13
- F1 PNG White Stripe Maroon Clownfish, WS14
- F1 PNG White Stripe Maroon Clownfish, WS15
- F1 PNG White Stripe Maroon Clownfish, WS16
- F1 PNG White Stripe Maroon Clownfish, WS4
- F1 PNG White Stripe Maroon Clownfish, WS5
- F1 PNG White Stripe Maroon Clownfish, WS6
- F1 PNG White Stripe Maroon Clownfish, WS7
- F1 PNG White Stripe Maroon Clownfish, WS8
- F1 PNG White Stripe Maroon Clownfish, WS9
- F1 PNG White Stripe Maroon, EC2
- F1 PNG White Stripe Maroon, FW2
- F1 PNG White Stripe Maroon, GL2
- F1 PNG White Stripe Maroon, MD2
- Lightning Breeding Directive
- Lightning Maroon Clownfish Links
Comments are closed.
Recent Comments